


How to use
PCG offers a versatile set of tools designed to enhance your Unreal Engine projects with ease. Follow these simple steps to make the most out of each system.
Biome Generator
- Drag and drop your Biome generator into the scene. Then, in the details tab of the generator, click "Configure" to spawn the Biome Holder. The holder represents the actual system, and the Spline Biome defines the area in which meshes will spawn.
- Replace the low poly meshes with the desired meshes in ‘Mesh Sets’, it’s important to do this right at the start so that when you adjust the parameters, the settings will be correct for the meshes you use. 💡 Mesh Sets are only available on paid plans but feel free to play around with the systems using the default assets


- Now you have swapped the meshes, you can begin to adjust the parameters to achieve the result you are looking for. There are a variety of controls for transforms, density, and exclusions. Each ‘Mesh Set’ also has its own controls.

- If you want to extend your biome to a separate area, simply drag and drop a new ‘Spline Biome’ in, this will use the settings you have previously set up but it will create new meshes for you.

Video Tutorial can be found below
Multi-Biome Generator
The Multi Biome is similar to the Biome Generator but there is 1 key difference, it uses the landscape material layers to separate the biomes, this allows for each material to be a separate biome.
To set up a landscape shader with layers, see the image below. You must have the ‘Landscape Layer Blend’ Node in your material, fortunately, this is a very common node in landscape materials.
The material Layer Name must be named from A to E, the system will identify each layer by their name.

- Drag and drop your Multi-Biome generator into the scene. Then, in the details tab of the generator, click "Configure" to spawn the Biome Holder. The holder is the actual system and the Spline Biome defines the area meshes will spawn in.
- Replace the low poly meshes with the desired meshes in ‘Mesh Sets’, it’s important to do this right at the start so that when you adjust the parameters, the settings will be correct for the meshes you use. The Multi Biome has Mesh Sets from A to E, these letters relate to the landscape data layers.


- On the Spline Layered Blueprint, enable the desired layers you are after (From A to E), this value will depend on how many materials you have on your landscape layer.


- Head over to the Landscape Painting settings and begin painting your biomes onto the Landscape. You can also smooth the mesh blends by using the ‘smooth’ tool in the paint settings.

- To adjust the parameters of the biomes, simply head over to the holder and select the layer configuration you are after, these layers will refer back to the landscape data assets.

Video Tutorial can be found below
Path Cut
- Drag the system into your scene, you will notice it starts with 2 spline points, you should position these over your biome where you want the path to cut out.

- To update the path cut you will need to regenerate the BiomeHolder, simply press ‘Cleanup’ and ‘Generate’.

- To create more spline points (curves in your path), simply hold ‘Alt’ whilst moving a spline point and this will create an additional point.

- If you notice the meshes aren’t being subtracted via the path cut, position it closer to the landscape and you can also scale individual spline points to subtract even further.

- Additional spline settings can be found on the ‘PCG_Holder’, such as scaling and mesh subtraction.

Video Tutorial can be found below
Path Generator
The path generator requires a landscape to function, it can be used on its own or in tandem with the biome generators.
- Drag the Path Generator into your scene, move the spline points as you need, and hold Alt + move the spline to create more points.
- Swap out your meshes in the ‘Mesh Set’ Tab.


- Adjust the parameters until you get the result you’re after. More advanced parameters can be found in later steps.

- To make the path wider or slimmer, use the Path Width Controls. By increasing 1 value a lot higher than the other, you can completely remove the exterior meshes from the system, this can be helpful for creating shorelines etc.


- To increase or decrease the range of the exterior meshes, you can adjust the ‘Assembly Extents’, the ‘Path Fade Distance’ will also control the scale fall off from the center of the path.

- By default placing the path through the Biome Generator will subtract the meshes and the path will take priority. The falloff can be adjusted in the PCG holder if you want the blend to be less noticeable.


- If a scattered path is not what you are looking for, we also have an option for a road generator. Simply access the blueprint and enable ‘Spawn Road Mesh’. To disable the meshes under the road, access your PCG parameters and select ‘Disable Path’.

- The path generator also comes with the option to deform the landscape based on the spline, this can either lower or raise the landscape based on the user's spline location. To enable/disable this simply select the ‘Deform Landscape’ option in the PCG settings.

Video Tutorial can be found below
Scatter on Mesh
- Drag ‘Scatter On Mesh’ into your scene, the first thing you’ll want to do is swap the base mesh for a model of your choosing.


- Now you have swapped the main mesh, you can begin swapping the meshes that will be scattered via ‘Mesh Sets’.

- Customize your parameters in the PCG tab, the settings are quite straightforward here. You can also customize the amount of meshes that are scattered to optimize your creations.

- Duplicate your system and create a completely new one, you can either use the same meshes with new parameters or vice versa.

Video Tutorial can be found below
Large Assembly
The large assembly scatters meshes on a base mesh that the user sets, if positioned near a landscape the option to scatter meshes around and on the landscape is also possible to assist with blending.
- Drag and drop the large assembly into your project, by default meshes will spawn at a low density to keep it optimized.


- Swap the template low poly mesh to a high poly mesh of your choice

- Swap the low poly scatterable meshes for your custom meshes in ‘mesh sets’

- Open up the PCG tab to see the parameters available to you. Most are self explanatory but some important settings can be found below.
Max Points For Assembly
- Controls the number of meshes that can spawn on or around the assembly.
Bounds For Exterior Meshes
- Increasing or decreasing these values will make the meshes on or around the assembly, increase/decrease in range, from the border of the assembly.
Grid Size
- A lower value will increase the spacing of meshes on the outskirts of the assembly, this can be quite sensitive so reduce this value slowly.

- Once you are happy with your assembly you can simply duplicate it and a new variation will be created, feel free to adjust the settings on the new assembly as you wish

Video Tutorial can be found below
Cliff Generator
The cliff generator scatters large meshes on a spline and creates a linear build, it also has smaller controllable meshes scattered on the main mesh.
- Drag and drop the cliff generator into your project, by default, meshes will spawn at a low density to keep it optimized.
- You can swap the low poly main meshes and scatterables to high poly meshes of your choice in the PCG blueprint.
- Open up the PCG tab to see the parameters available to you. Most are self-explanatory, but some important settings can be found below.
- Once you are happy with your cliff assembly, you can duplicate it, creating a new variation. Feel free to adjust the settings on the new cliff assembly as you wish.
Rock Spacing
- Controls the number of meshes that will spawn on the spline. Lower Spacing means more meshes.
Rock Seed
- A randomizer that changes scatter configuration.
Max Sample Points
- Indicates the amount of Top Mesh and Side Mesh scattered on the main mesh.
Video Tutorial can be found below
Fence Generator
The fence generator scatters large meshes on a spline and creates a linear build. It also has smaller controllable meshes scattered around the main mesh on the landscape.
- Drag and drop the Fence generator into your project.

- By clicking on BP_FenceGenerator, you can swap the main mesh and access the main mesh settings.
- In PCG_FenceGenMeshSet, you can swap scatterables for high poly meshes of your choice.

- Open the PCG tab to see the parameters available. Most are self-explanatory, but some important settings are below.
- Once you are happy with your fence assembly, you can duplicate it, creating a new variation. Feel free to adjust the settings on the new cliff assembly as you wish.
Disable Meshes
- Turns off all meshes that are scattered on the landscape.
Seed
- A randomizer that changes scatter configuration.
Grid Extents
- Indicates the amount of Top Mesh and Side Mesh scattered on the main mesh.
Video Tutorial can be found below.
Water Generator
The water generator spawns a water plane defined by a spline and scatters three (3) sets of meshes. The interior of the spline also adjusts the landscape height.
- Drag and drop the water generator into your project. By default, meshes will spawn at a low density to keep it optimized.
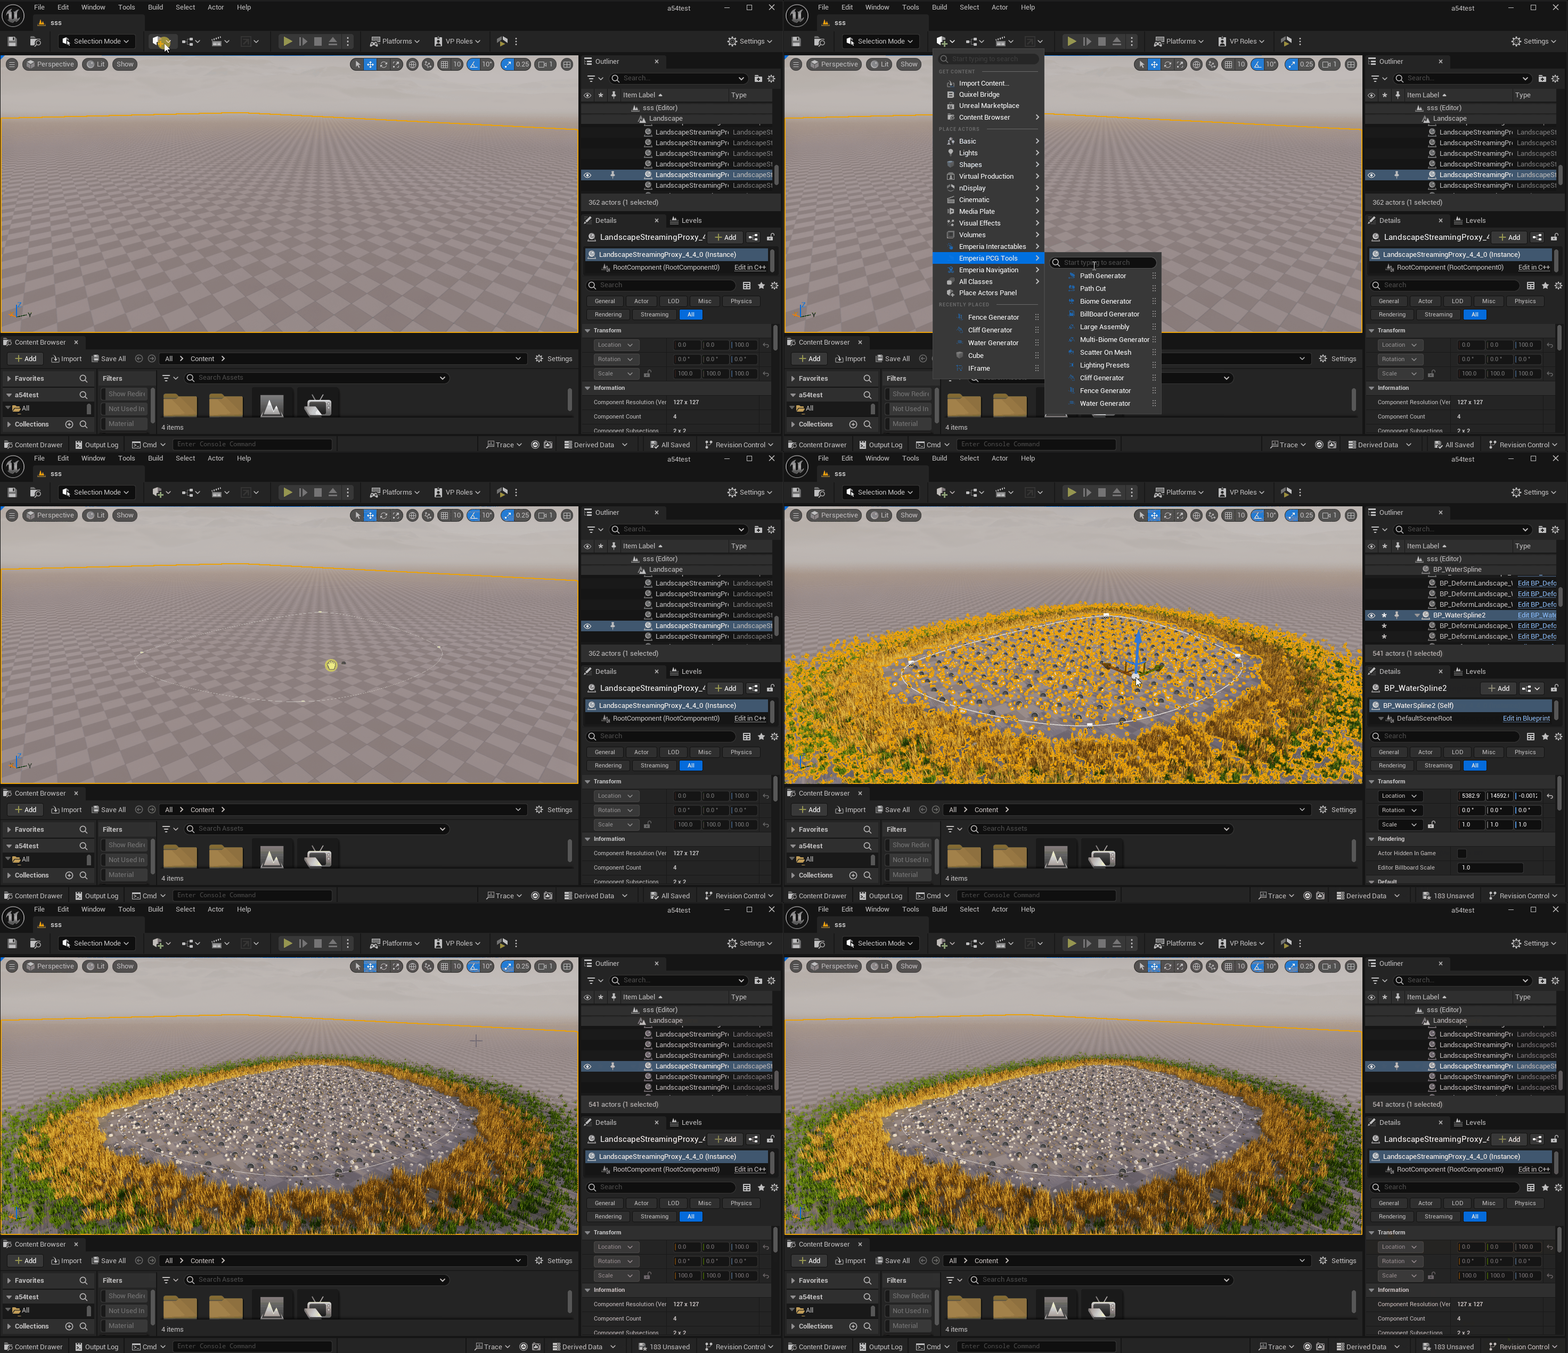
- You can adjust the spline shape and press “Generate Water Mesh.” Under the button, you can also find two (2) settings to change the plane that is spawned.
- The tool has three (3) different mesh sets, the names of which are self-explanatory. You can swap low-poly meshes to your liking.
- Open the PCG tab to see the parameters available. Most are self-explanatory, but some important settings are below.
Surface Mesh Grid Spacing
- Controls the number of meshes that will spawn around the spline. Lower Spacing means more meshes.
Disable Water Meshes
- Turns off all meshes underwater.
- Once you are happy with your water system assembly, you can duplicate it, creating a new variation. Feel free to adjust the settings on the new cliff assembly as you wish.
Video Tutorial can be found below.
Help & Support
If you have questions, suggestions, or feature requests, please join the Official Emperia Discord channel!
You can find support here through private support tickets or general conversation. You will also have the opportunity to showcase your work and chat with like-minded individuals across industries using Creator Tools, Unreal Engine, those creating immersive experiences, and more!
If you prefer, you can also reach out to us via email.