
Best practices
This document describes our recommended flow of rendering the space.
Getting Started
Rendering your 3D environment is now easier than ever, our built in automated renderer removes all the need for manual labour and it automates the entire process.
Rendering with Automated Renderer
The Auto Rendering feature employs Unreal's native MovieRenderQueue functionality.
It involves capturing six different views: upward, downward, leftward, rightward, forward, and backward. Subsequently, we utilize a Utility Widget blueprint to combine these six views into a 3x2 projection image, which is then transformed into an Equirectangular monoscopic 360-degree image.
Prerequisites:
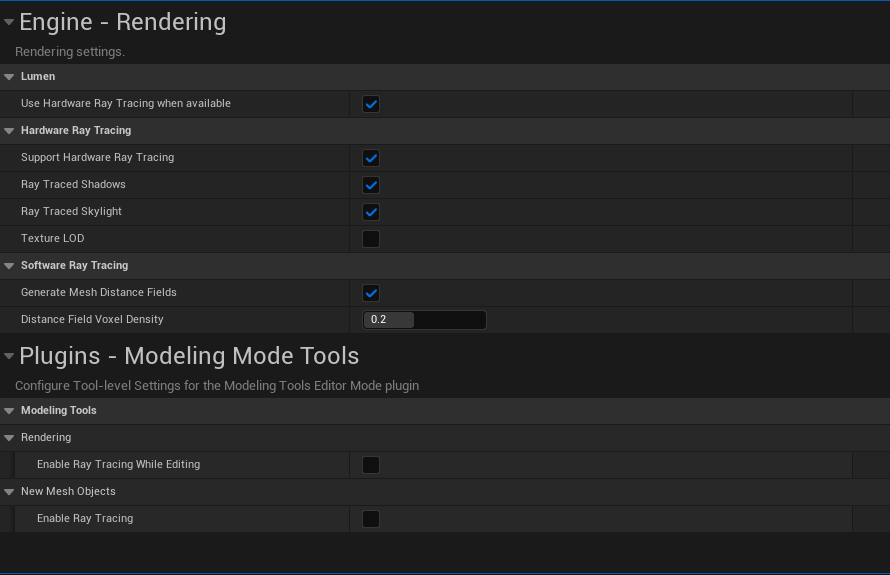
In order to activate automatic ray tracing rendering, you need to initially configure the following project settings as prerequisites, which only need to be done once for the entire project:
Activate ray tracing in your project settings.
Next, launch the editor utility widget, You can reach the rendering editor by navigating to Toolbar, then selecting Window followed by Emperia3DKit. Doing so will launch a fresh editor window where you can modify Interactable elements within the level and also generate or modify Experiences.

Here, you will find the paths and commands that are generated specifically for your current project within the Paths to set" section on the last page. Note: FFMPEG setup is now fully automated—it downloads the required library, sets up paths, and applies the correct parameters when the project is first launched with the Emperia Toolkit installed and active.

Subsequently, you should copy the MPE Executable path into the "Project settings - Plugins - Movie Pipeline CLI encoder - Executable Path" field. Similarly, paste the MPE Command line format into the "Project settings - Plugins - Movie Pipeline CLI encoder - Command line format" field.
Additionally, it's essential to modify the following post-process settings to prevent any visual artifacts or seams in the scene.

Process:
Once you've configured the project settings and command line arguments, proceed by selecting a UI Model to use, we have a default UI you can find in the Plugins > Emperia3DKit Content > UI_Config folder in your content browser. Next, define the range of panoramas you intend to capture. Following that, fill in the necessary parameters—such as "ExperienceName," and "SceneName"—required to generate the experience.
Upon clicking "Create," this action will remove all temporary renders, generate a JSON file, capture 360 panoramas, create a payload file using both panoramas and the JSON file, and subsequently upload this data to Creator Tools Dashboard. This process is designed to either create a new experience or update an existing one on the platform

Help & Support
If you have questions, suggestions, or feature requests, please join the Official Emperia Discord channel!
You can find support here through private support tickets or general conversation. You will also have the opportunity to showcase your work and chat with like-minded individuals across industries using Creator Tools, Unreal Engine, those creating immersive experiences, and more!
If you prefer, you can also reach out to us via email.